This Blog will show detailed information about Powershell SCP, Installation of SCP on Powershell (Windows host), practical demos to use SCP by transferring data between windows Powershell and a Linux host, etc.
What is SCP?
SCP for Secure Copy Protocol. Powershell SCP command can be used to securely transfer files between local and remote hosts. We can consider it similar to a secured FTP. By default, SCP runs on Port 22. The SCP client can upload files to the SSH server or request files and folders for downloading.
About the module: Posh-SSH
It is a windows Powershell module that uses a custom version of the SSH.NET Library to provide SSH functionality in windows Powershell. It provides functionality for automating SSH, SFTP and SCP actions. It supports public key, password and keyboard-interactive methods for authentication. It supports RSA and DSA private key mechanism. We can also use SOCKS4, SOCKS5 and HTTP Proxy methods. Remote, dynamic and local port forwarding can be done by SCP.
The main purpose of the module is to facilitate automating actions against one or multiple SSH enabled servers. This module is more useful to red teamers to transfer the data between hosts using Powershell.
Note: This module is for Windows PowerShell 3.0 or above. It is compiled for .NET Framework 4.5.
By default, SCP Functionality is not installed as Powershell cmdlets.
Now to use it, we have two options:
1. Install the SCP module by the following command :
Install-Module -Name Posh-SSHOR
2. Download the module from Github repository and include it at runtime directly in Powershell, Then use it directly.
Here we gonna use this method. So let’s start.
Download Posh-SSH form Github Repository: https://github.com/darkoperator/Posh-SSH
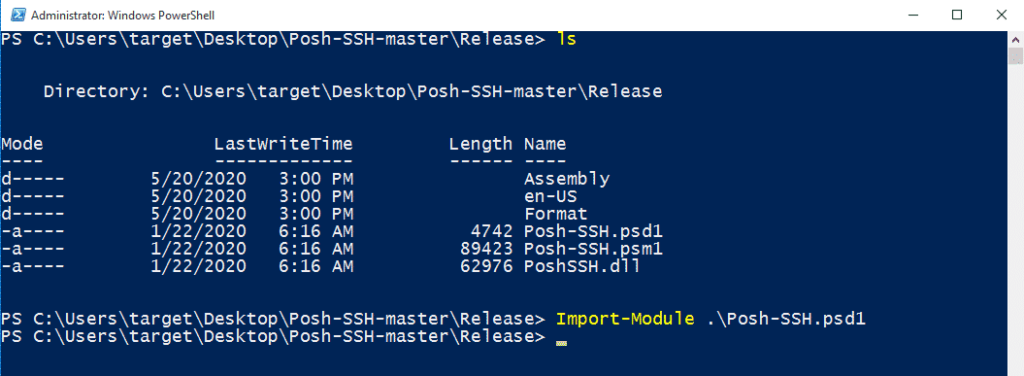
Navigate Powershell to the directory : \Posh-SSH-master\Release\
Import Posh-SSH module by using the following command:
Import-Module .\Posh-SSH.psd1
After including the module, we can use all the functionality provided by Posh-SSH :
- Get-SCPFile – Download files from remote servers.
- Get-SCPFolder – Download the Entire folder from remote server.
- Get-SCPItem – Download both files or folders from the remote servers.
- Set-SCPFile – Upload files into remote servers.
- Set-SCPFolder – Upload the Entire folder into the remote server.
- Set-SCPItem – Can upload both files or folders to the remote servers.
And many more included Documentation of the repository.
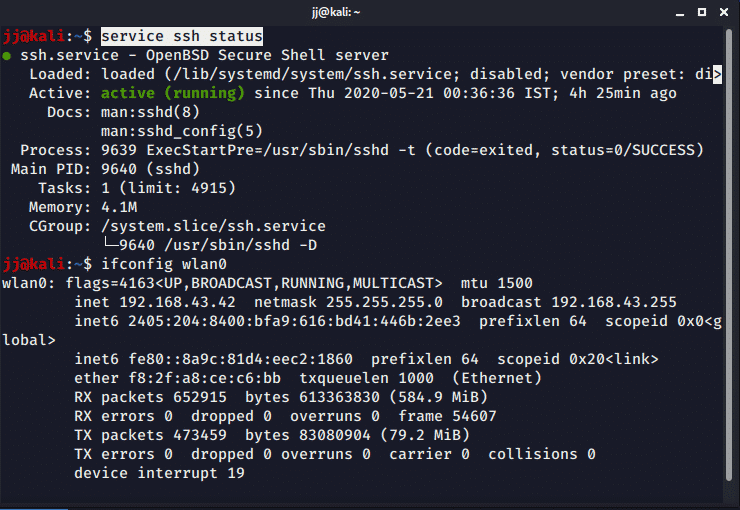
Before using this module on Powershell, let’s confirm that SSH service is running on remote host. Use command service ssh status to confirm.

If SSH is not running then start the SSH service on the remote host using the command :
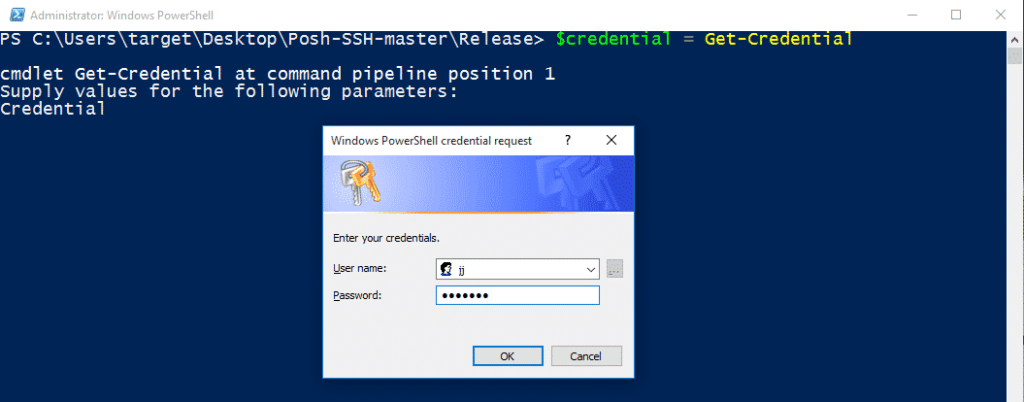
service ssh startNow to use the SCP Functionality with the Posh-SSH module, we need to supply username and password as PSCredential to Powershell for authentication of the remote host. Run the following command :
$credential = Get-Credential
Supply the credentials of the remote host and click OK. It will store credentials in a Powershell variable that we can use further directly.
Download files from remote server Using Get-SCPFile :
Use the following command:
Get-SCPFile -ComputerName 'REMOTE_SERVER_IP' -Credential $credential -RemoteFile "REMOTE_SERVER_FILE_PATH" -LocalFile "LOCAL_FILE_PATH"
Here,
- ComputerName – Remote Host IP address
- Credential – Credentials variable
- RemoteFile – Remote file path which we want to download
- LocalFile – Local file path and name to store the downloaded file on the local machine.
Download Folder from remote server Using Get-SCPFolder :
Use the following command:
Get-SCPFOlder -ComputerName 'REMOTE_SERVER_IP' -Credential $credential -RemoteFolder "REMOTE_SERVER_DIR_PATH" -LocalFolder 'LOCAL_DIR_PATH'
Here,
- ComputerName – Remote Host IP address
- Credential – Credentials variable
- RemoteFile – Remote directory path which we want to download
- LocalFile – Local directory path and name to store downloaded content of a directory on the local machine.
Here we can also use Get-SCPItem module. Get-SCPItem module can be used to download anything from the remote server, it can be files or directory. It is a general-purpose module to download the data from the server.
Command :
Get-SCPItem -ComputerName 'REMOTE_SERVER_IP' -Credential $credential -Destination "REMOTE_SERVER_FILE_PATH" -Path 'LOCAL_DIR_PATH'Upload File to the remote server:
The file can be uploaded on the remote host using two SCP methods
- Set-SCPFile
- Set-SCPItem
Upload file by Set-SCPFile :
Use the following command:
Set-SCPFile -ComputerName 'REMOTE_SERVER_IP' -Credential $credential -RemotePath "REMOTE_SERVER_DIR_PATH" -LocalFile 'LOCAL_FILE_PATH'
Here,
- ComputerName – Remote Host IP address
- Credential – Credentials variable
- RemotePath – Remote directory path where we want to upload the file.
- LocalFile – Local file path and name which is to be uploaded on the server.
Now, We can confirm on Linux host that the file is uploaded successfully,

Upload file by Set-SCPItem :
Use the following command:
Set-SCPItem -ComputerName 'REMOTE_SERVER_IP' -Credential $credential -Destination "REMOTE_SERVER_FILE_PATH" -Path 'LOCAL_FILE_PATH'
Here,
- ComputerName – Remote Host IP address
- Credential – Credentials variable
- Destination – Remote directory path where we want to upload the file.
- Path – Local file path and name which is to be uploaded on the server.
Confirm on Linux host that the file is uploaded successfully,

Upload Folder to remote server Using Set-SCPItem :
Set-SCPItem module can be used to upload both files and folders on remote server. It is very useful to transfer content because it is a general-purpose module.
Use the following command:
Set-SCPItem -ComputerName 'REMOTE_SERVER_IP' -Credential $credential -Destination "REMOTE_SERVER_DIR_PATH" -Path 'LOCAL_DIR_PATH\*'
Here,
- ComputerName – Remote Host IP address
- Credential – Credentials variable
- Destination – Remote directory path where we want to upload the folder.
- Path – Local directory path and name which is to be uploaded on the server. Here, don’t forget to use “\*” at the end otherwise, it will generate an error.
Confirm on Linux host that the directory content is uploaded successfully,

So, here the content of local folder “evil” is copied to the remote folder “/home/jj/test/“.
Note: To upload folders on remote host another command “Set-SCPFolder” can be used, but it will generate the following error when I am trying to use it.
Error: Set-SCPFolder : scp: error: unexpected filename: .
So, Set-SCPItem is the best module to copy contents to remote hosts because It can upload both files and folders.
There are many more modules of SCP available in Posh-SSH library. We can do many things using this. So go through all the modules included once, to make wider your knowledge.
Reference:
- Documentation of Posh-SSH modules: https://github.com/darkoperator/Posh-SSH/tree/master/docs


